About the Master-less Leak Tester
About the Master-less Leak Tester
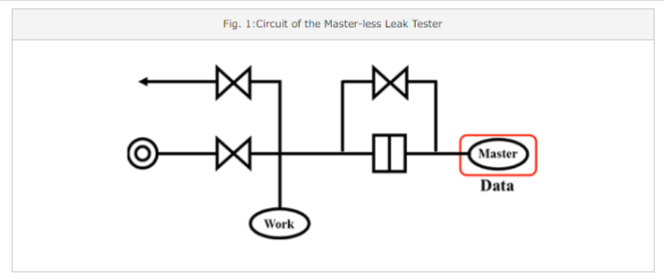
The Master-less Leak Tester measures the differential pressure with the workpiece using a built-in master tank and master data as reference, thereby allowing differential pressure leak tests (master comparison) to be performed without the need to use an external master as judgment criteria. The Master-less Leak Tester has no external master, therefore there is no fluctuation of the built-in master data due to external factors, and stable measurement is always achieved. Moreover, the Master-less Leak Tester records the differential pressure properties of workpieces (master data), in order to respond to workpieces with various different volumes. Less time is required for measurement than the conventional differential pressure leak tester, which uses an external master. The measurement circuit of the Master-less Leak Tester is shown below (Fig. 1).
Background to Development
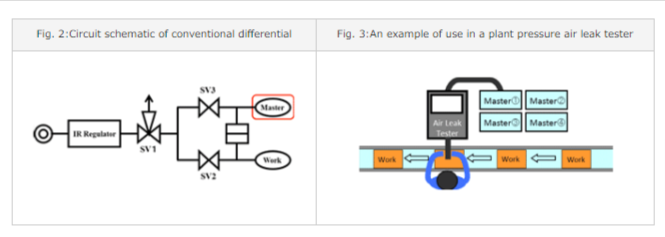
The conventional differential pressure leak tester detected leaks by using the below basic circuit to measure the differential pressure of the external master and the workpiece (Fig. 2). Out in the field, however, there was a need to respond to many different workpiece varieties, meaning that plants needed to prepare several external masters (good products) (Fig. 3). However, it became apparent that having an external master leads to various problems, as detailed in Table 1, and negatively affected measurement accuracy, reliability and cost. The Master-less Leak Tester was developed with the objective of achieving stable accuracy and improving reliability by removing the external master, which is the cause of negative effects.
Table 1: Problems associated with external master
Problems which arise when using physical masters
・Master heat accumulation, heat dissipation property changes over time
・Mechanical fatigue of masters, change in properties
・Maintenance and cost of masters (periodic replacement, maintenance, securing space)
Relationship between product and compensation method
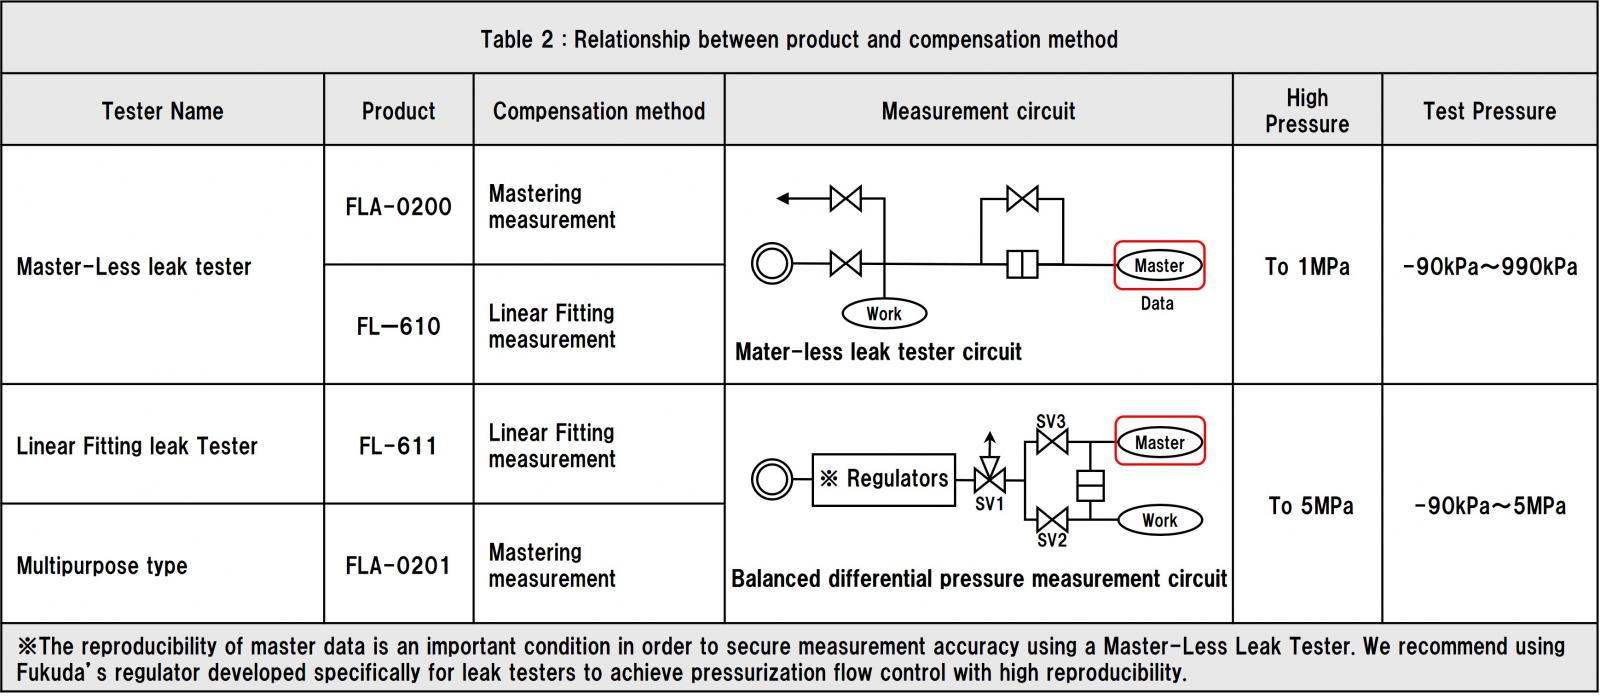
Since the circuit in Figure 1 cannot handle high pressure testing, a multipurpose leak tester with mastering function and a leak tester with linear fitting correction function were developed to handle high pressure testing even with conventional circuits as shown in Figure 2. In both methods, normal measurement is performed after master data is constructed.
Please refer to the list below for the correspondence between products and correction methods. (Table 2)
Compensation method utilizing master data
Mastering Measurement, Fitting Measurement and Linear Fitting Measurement are the 3 methods of compensation for performing leak tests by utilizing master data.
Mastering Measurement
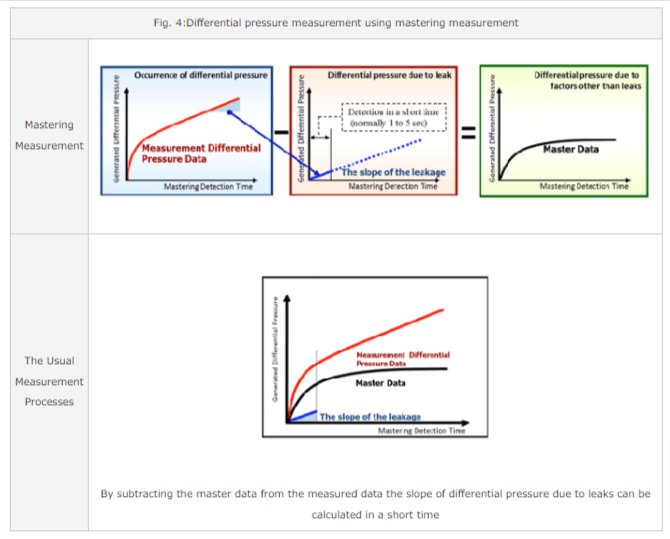
Mastering measurement has a longer detection time than normal measurement and is used to build master data. The detected differential pressure data is divided into linear elements (differential pressure fluctuation caused by leaks) and non-linear elements (environmental factors other than leaks), with the non-linear elements recorded as master data (elements causing differential pressure other than leaks).This becomes the judgment criteria for leak tests as master data combining various different factors such as the effect of compression heat, the effect of seal rubber, the effect of workpiece temperature and temperature change. Normal measurement is performed using the built master data (Fig. 4). In this normal measurement, the built master data is subtracted from the differential pressure data and the linear elements of the leak are calculated.
Fitting Measurement
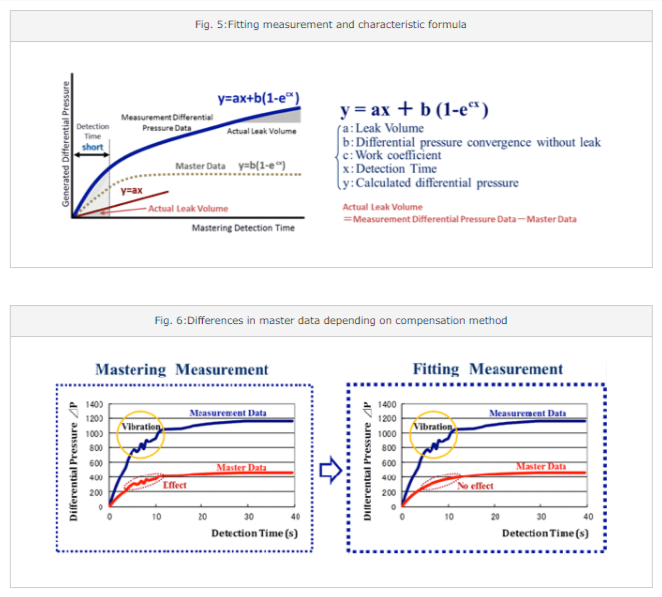
Fitting measurement is the method of building ideal master data using a calculation formula. In fitting measurement, calculations are performed in order to build master data while measuring actual data. Leak volume is calculated by finding the fixed number where the measured data and numerical formula (shown on the right of Fig. 5) match. The difference between mastering and fitting measurement is that when master data is built, disturbance of measurement data caused by external influences such as vibration are compensated for by the formula, thereby allowing master data to be made smoothly. As an example, Fig. 6 shows the difference in mastering measurement and fitting measurement if a vibration was found to have occurred during measurement. If vibration occurs during mastering measurement, the master data is affected and disturbance is created, meaning it is necessary to redo measurements. However, in the case of fitting measurement, even if there is vibration, the master data is not affected. This compensation method acquires master data with high reliability.
Linear Fitting Measurement
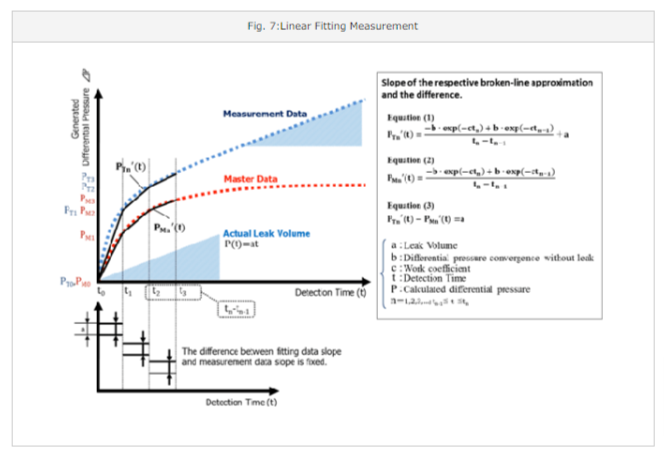
Linear fitting measurement separates the curves of master data and measured data over unit of time and calculates leak volume from the difference in the slope of the respective broken-line approximation (Fig. 7). First, the differential pressure data obtained from a workpiece with no leaks is separated over a set time and the slope of that unit of time is created as a master data equation (2). In normal measurement, slope equation (1) per unit of time for actual differential pressure (measured data) is acquired and leak volume is calculated by taking the difference in slope with master data in equation (3).
Features of differential pressure measurement using master data
Pressurization time, detection time reduction
Easy setup changeover
Master data recording and master workpiece storage is easy and master data switching is simple.
Severe judgment of reject parts
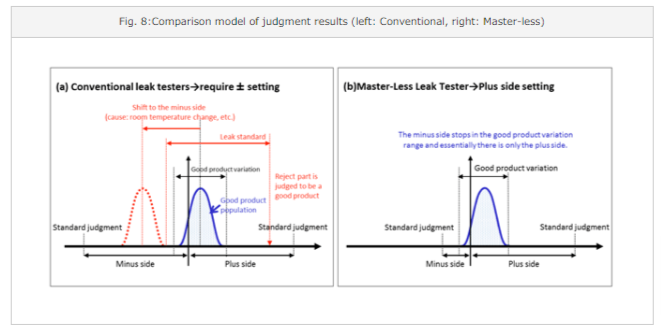
The common master comparison method uses a physical master, therefore there are judgment values on both the plus side (workpiece) and minus side (master). Fig. 8 (a) shows that if the good product population is shifted towards the minus side due to effects such as room temperature, there is a possibility that reject parts won’t be detected even if a leak above the standard is present. Meanwhile, in (b), by using master data instead of a physical master, the minus side judgment value is no longer required, meaning there is no need to worry about leaks emerging on the minus side and leaving only the plus side judgment value. As such, it is less likely that incorrect judgments will be made and the judgment accuracy is more severe than the conventional one.
Reduction of incorrect judgments caused by changes over time
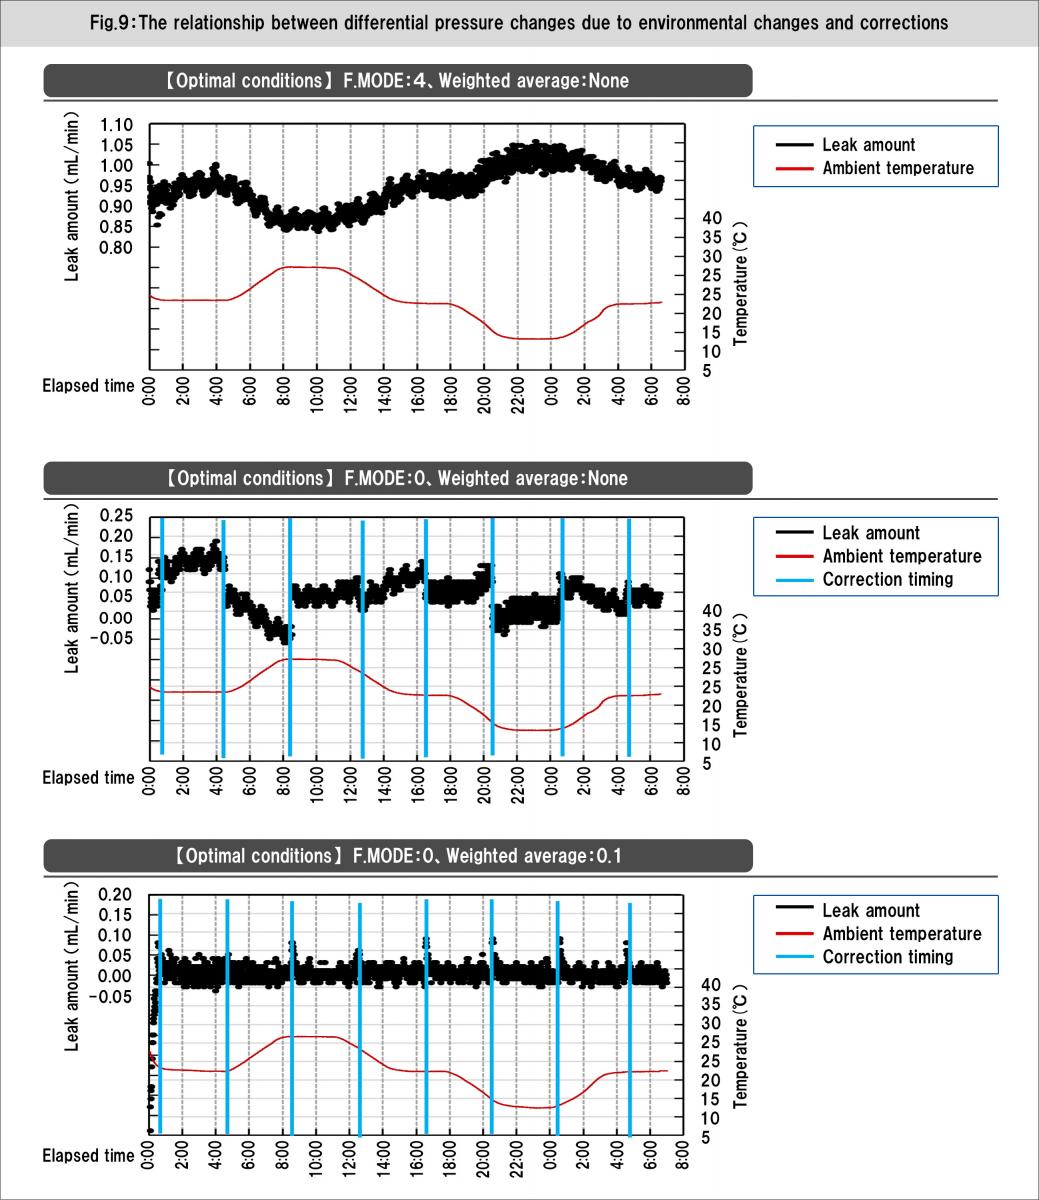
By updating master data to suit changes in the environment, it is possible to always perform measurement with the optimal conditions. The upper graph of Fig. 9 shows a state where change in the room temperature (from 10 to 30 ℃, approx. 20°C) affected measurement results and resulted in a drift (from approx. 0.85 ml/min to approx. 1.05 ml/min).By updating master data, it is possible to obtain the stable measurement result shown.
